Fred's legal and ILLEGAL Rigging
I posted some new photos. The shockcord in my outhaul old system has been ruled to be illegally used. Also the clew strap is approved by the class membership vote.
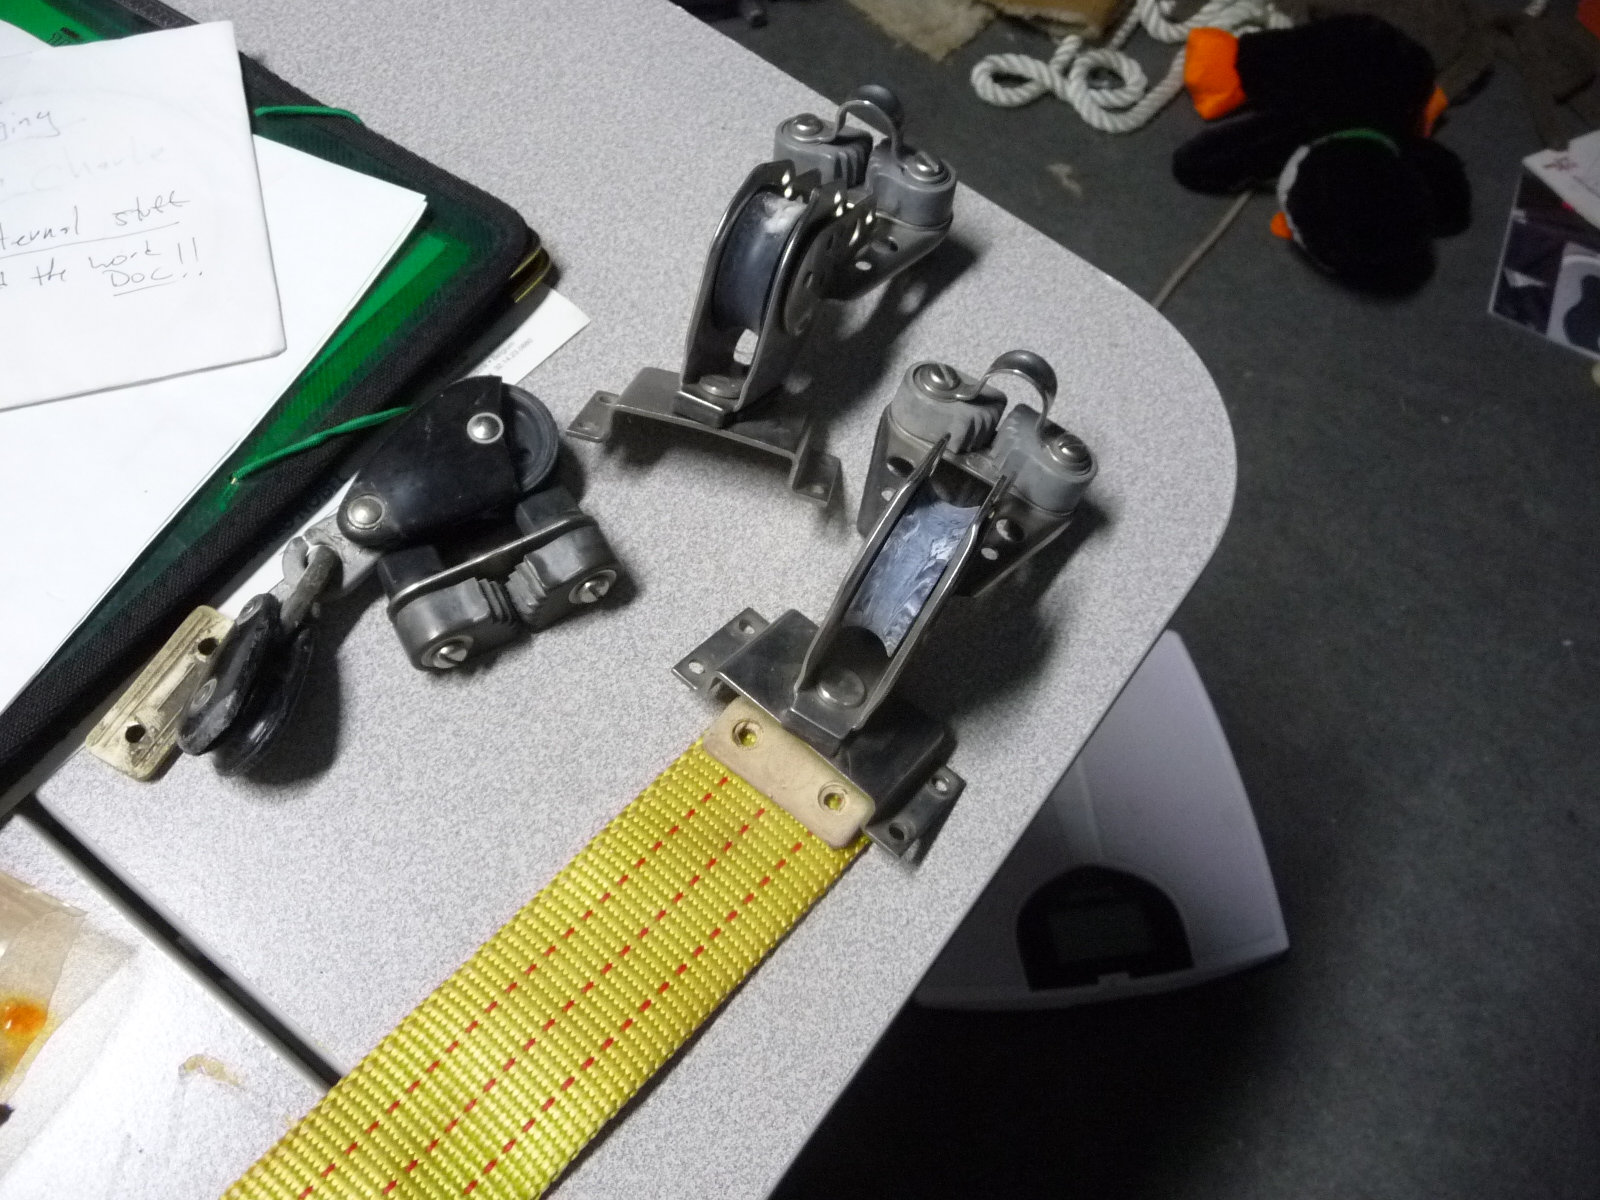
For those of you who do not have all the fancy new hardware, I have left the original Fred Rig shots on this page. Just scroll down until your find them.
MY DISCLAIMER. PLEASE READ: I have looked at a few other rigs. Mine is not unique anymore because some people have chosen to copy what I have done. So far I am pretty happy with what I have done. If later on I decide that this rig is totally bogus I will take these photos off the site and re- do the page. In the meantime, if you spend money and later find out you used this site to get some bad ideas....don't expect any sympathy. ( I will commiserate)
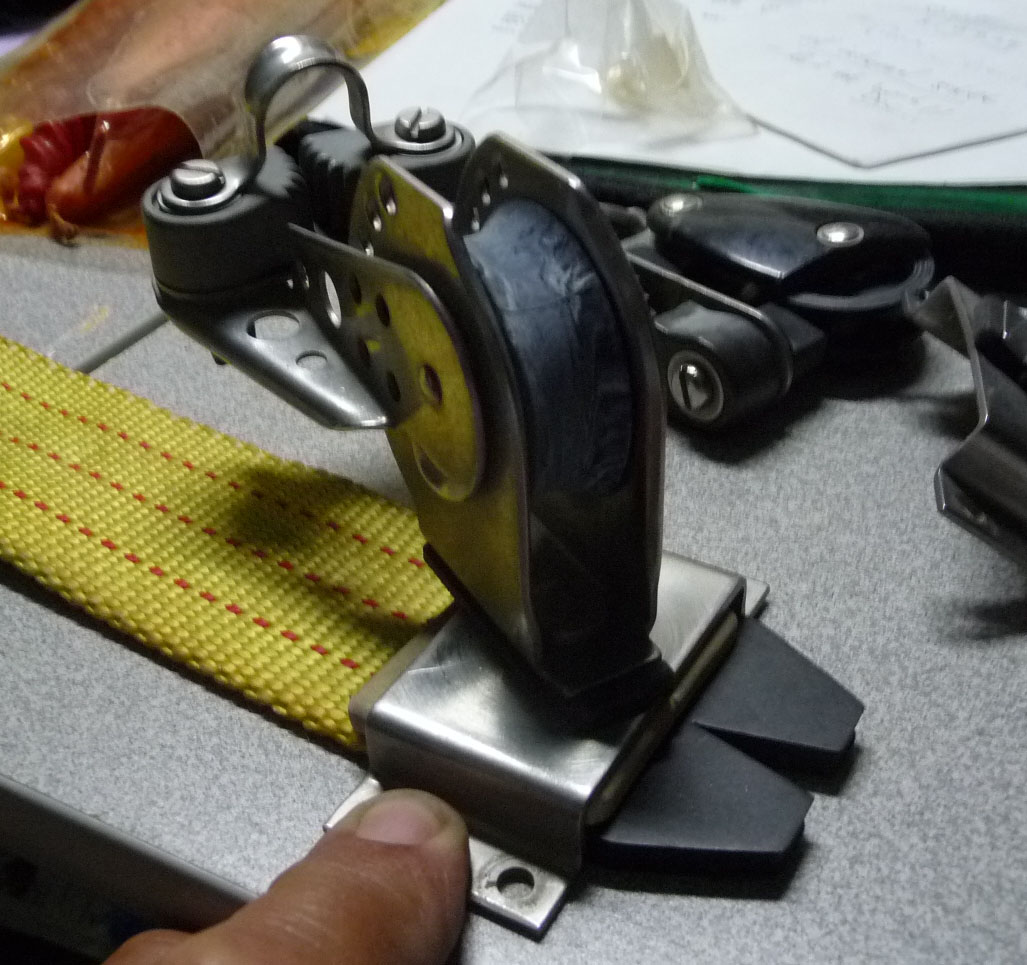
Note: Way down at the bottom I am working on posting photos of some really ancient before there
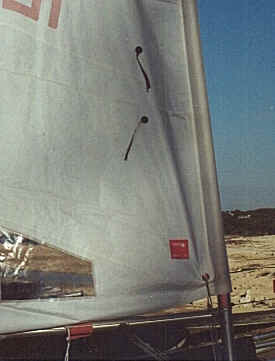
was fire rigging like this old swivel block that was the only legal swivel until 2005
It was held down by the four holes one of which is
visible next to my thumb
On to more recent stuff
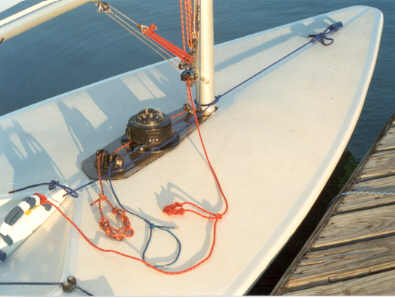
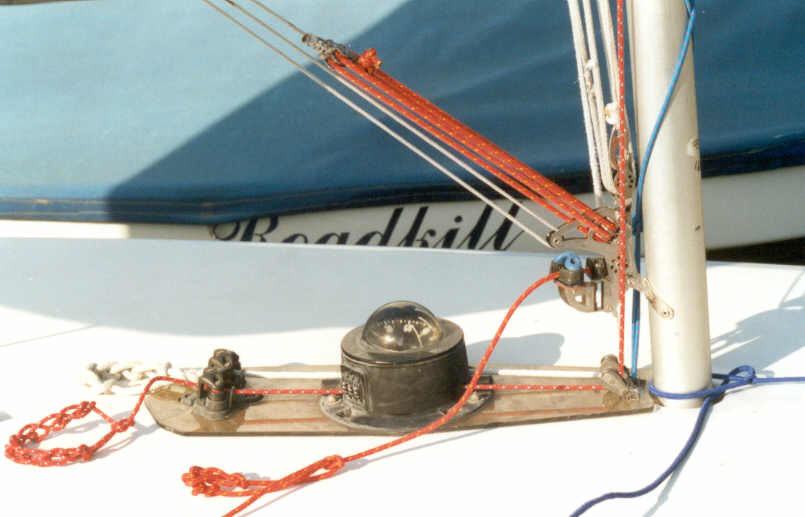
Photo resolution will probably be a problem. In an effort to make the photos small enough for the net I may have lost too much detail. Notice the Sunfish next to my boat...Deke Dekeyser's ROADKILL.He only sails it sometimes. He prefers his real boat...the Laser.
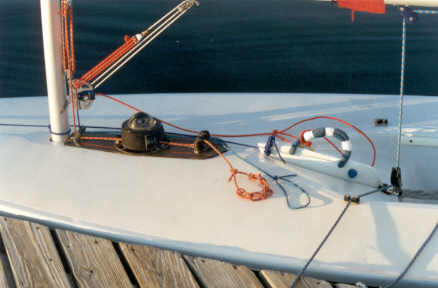
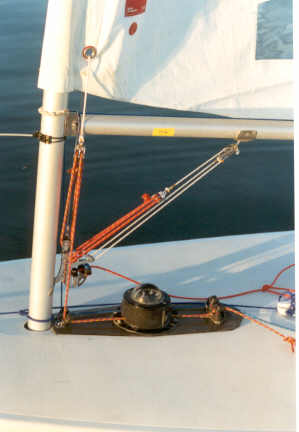
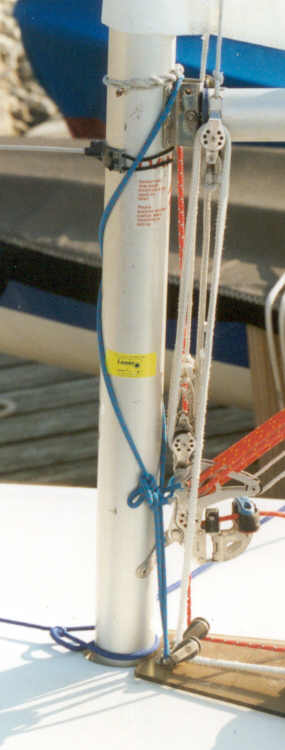
My compass is from 1983 and was built in France. I am still fiddling with the handle configuration but when I went sailing all these controls worked as they are shown. Notice that only the vang is led to the centerboard. I think that I want all the lines to go there but there was simply not enough line. Notice how the Shock cord is tied around the mast. I have rigged this way for years. The shock cord does not catch on the vang. The Centerboard end is simply led through the blade and a few loops are weaved to keep it in place. (woven?)
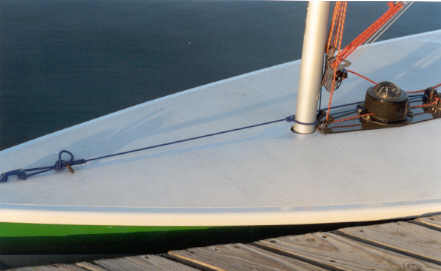
Let's start at the front. The shock cord is double ended. It is held in place by tying a bowline that is slightly smaller than the mast diameter. One tail leads to the boweye. The other tail goes back to the blade. The purpose of the line led to the boweye is to keep the knot in front of the mast. This keeps the aft shockcord half a mast width to the right and out of the way of the other control lines.

Finishing up on the shock cord. The cord does not pass through the loop that you see on the blade. It just looks that way. In fact, I twist the tail of loops so that they hang down on the port side of the blade. I just pulled the loops up so they would show. The shock cord around the mast does slowly slide up as the day goes on. I probably push it down to the deck about once per race. A quick flick of the cord while the board is down allows full access to the cleats with no interference from the cord.
Special note: I use the shockcord to hold the vang, cunningham, and outhaul lines in place when I de-rig the boat. I tie two half hitches around the mast and all the lines I can gather and then tie the tail to the gooseneck. Rigging with well secured and stored lines is super simplified. All I need to do is slide the sail on the mast, run the lines through the pulleys, compass, and cleats. With the addition of a quick connect system for the cunningham I think I will be back under five minutes between uncovering the boat and shoving off the dock.
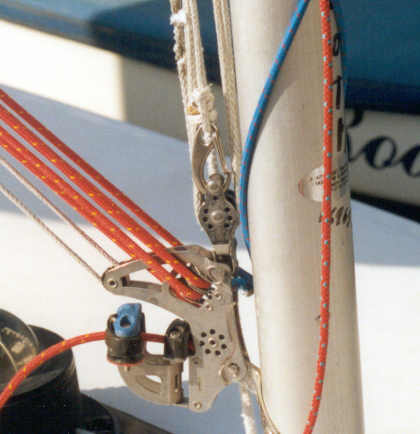
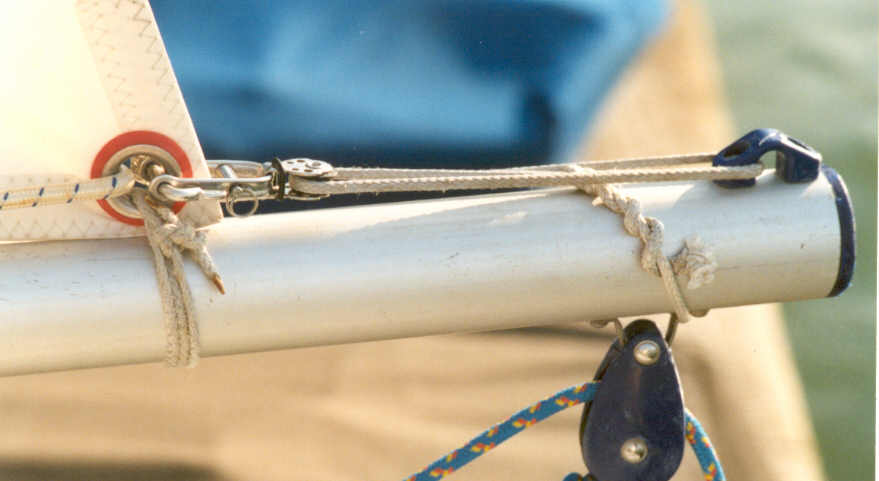
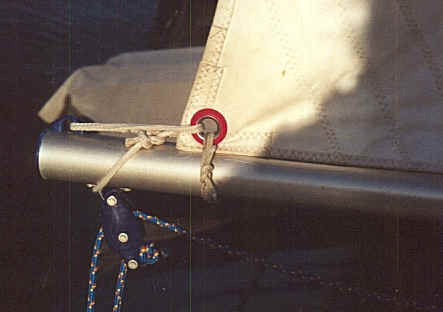
Check out this neat shackle that holds the end of the cunningham line. It passes through the grommet on the sail and allows me to actually remove the sail without fiddling with the dinky knot in that skinny slippery line.
West Marine stocks the thing. West model # 116079
also>> Wichd model #2480
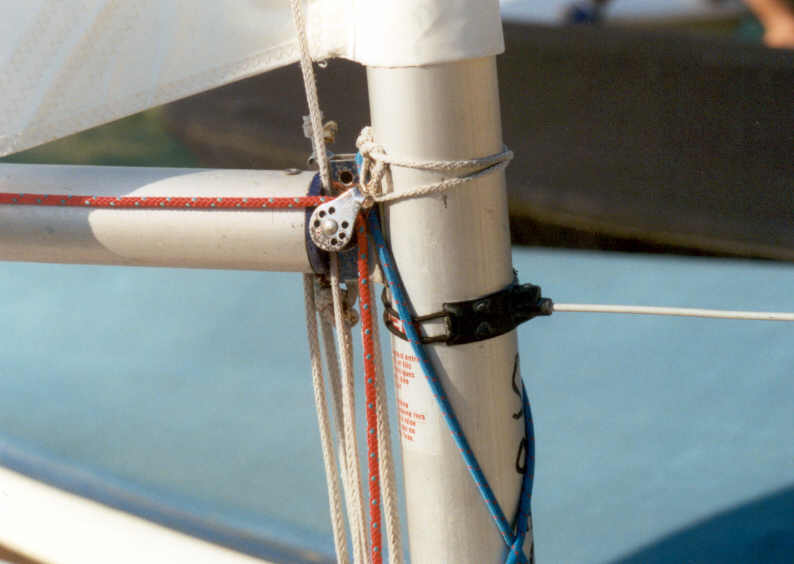
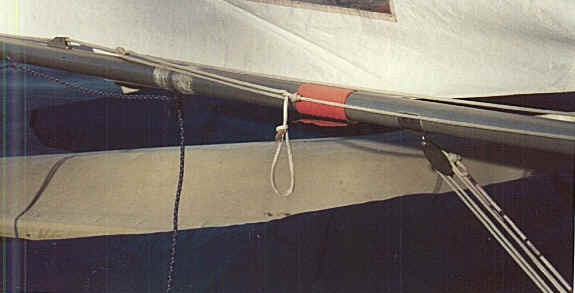
This shot is supposed to show the knot that holds the little outhaul pulley in it's place by the gooseneck. The line is my old clew tie down from the good old rig. I tied a square knot and then passed the tail through between the mast and the line to further tighten the set up. This tight knot keeps the pulley entirely in front of the boom end. It seems to run more freely than when the pulley sits beside the boom.
The skinny Spectra cunningham tail is set up with too long of a line for heavy wind. I ran out of purchase when the wind picked up. Since taking these photos I have found a tiny strong shackle for the end of this line. It is way too hard to untie this line with cold fingers. There is a simple way to wind the line around the shackle so that you can create a light and heavy air adjustment. Somehow it seems wrong to have the pulley rub up and down past the boom but I have found that I need that much adjustment to go upwind and downwind properly trimmed. I installed the shackle on the end of the line that does not show in this photo. I absolutely do not want the shackle rubbing up and down past the boom and the shackle would also lessen the amount of available adjustment if it were on this side.

Here are a whole lot of shots of the general workstation. My
handles need work. The centerboard handle is made from one piece of 1/2 inch
Samson regatta braid. There are three thicknesses of the line in the arch
part. You can figure out the rest.
Check out the white cunningham line. it is my old cunningham line from my old, pre new fittings and lines, rig. It just happens to be about the right length and it the handle stays tied all day. Scroll way down the page to see the old use of this line and find the material and length.
OLD COMPLAINT: I have had a heck of a time keeping my stopper knot tied in the cunningham line that was supplied with the rig. Perhaps it will wear and hold better but in the mean time I have been tying a bowline with three extra half hitches. The line unties itself within an hour or two of sailing. That is not good and I am seeking a solution.
Notice that the cunningham is rigged for light wind. There is no way you can get the thing tight enough for a windy day if you rig the thing with as much tiny line as I used.
Note that the cunningham line is tucked into the space between the boom and the mast. I do not want to have the outhaul rubbing on the line.
I love the shackle and pulley for the clew attachment. Some tiny folks have told me that the outhaul cannot be pulled tight enough with my shackle and bowline around the boom system. I wonder why anybody would ever pull the outhaul that tight. The outhaul only moves the bottom part of the sail If you flatten the lowest part you lose any power wjhatcoever and with no return on the leach all you can do is blow sideways around the course. I don't care if it is blowing 30 plus. I need some draft down low or I cannot steer up the face of waves.
Note the fact that I have passed the tail of the inhaul shockcord through the cleat. The way I read the rule, you must "attach" the shockcord to the cleat. I always tie a stopper knot and let the knot hold the cord from slipping through. I believe that is "attached." As shown it is not "attached." In the picture above, the shockcord is tied with a loop that goes through the clew. The bowline is hidden behind the aft outhaul pulley in this photo. I though I would simply put one shock cord on every sail I own and then pass the tip through the cleat when I rig.
It was a DUMB IDEA!!
This weekend's rig was to pass one end through the cleat as shown and tie a stopper knot in that shockcord so it would always stay on the boom. Just behind the cleat I tied a loop in the shockcord. I passed the other end through the clew and back to the loop where I tied it with a few half hitches. I don't like the system but it works. At the next regatta I will inspect somebody else's boat.

The red line is about 20 feet long. It is made from one of those handy 25 foot spools of line that Yale sells. 3/16th inch and with a Spectra core.
Note how the line exits over the top of the rudderhead. If your metal is sharp you will need to dull it a bit by whacking it, dragging it on some concrete or sanding it. The tie down line will not drag on the deck. Note my purchase system. The line is difficult to force through the cleat. I burned about an inch of the tail so that it is a better spear. When I pass the line through the second time I slide the first line to drag the second line with friction. Usually I leave the tiller tied in place for months at a time. If I forget my name while puking off the back of the boat, I read the blue letters.
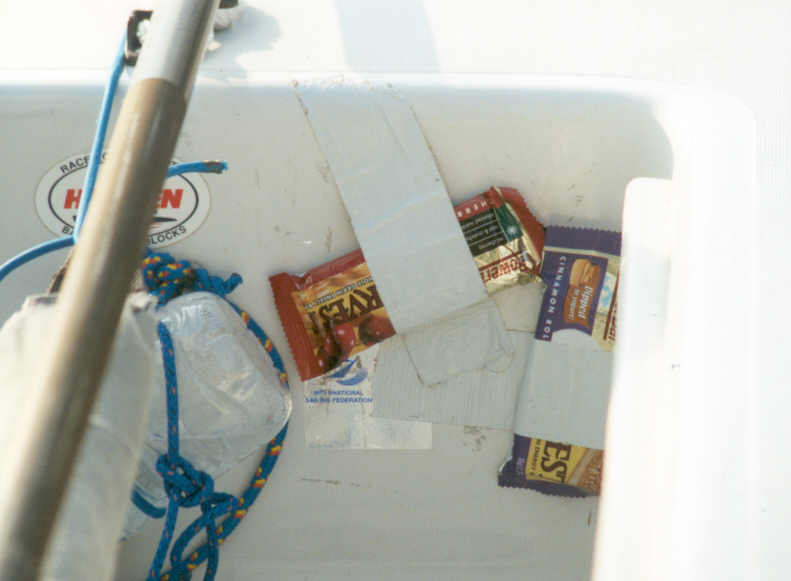
Typically I tape about foru or five powernbars in the back of the cockpit. These were taped in place at a regatta in Dallas a few weeks ago and then they rode home upside down on the roof of my van. Now they sit under the cover all day and roast. I bet they taste like cardboard by now but I am too cheap to throw them away. I sold this boat already and I plan to leave the bars for the new owner. The kid is a teenager. Teenagers will eat anything.
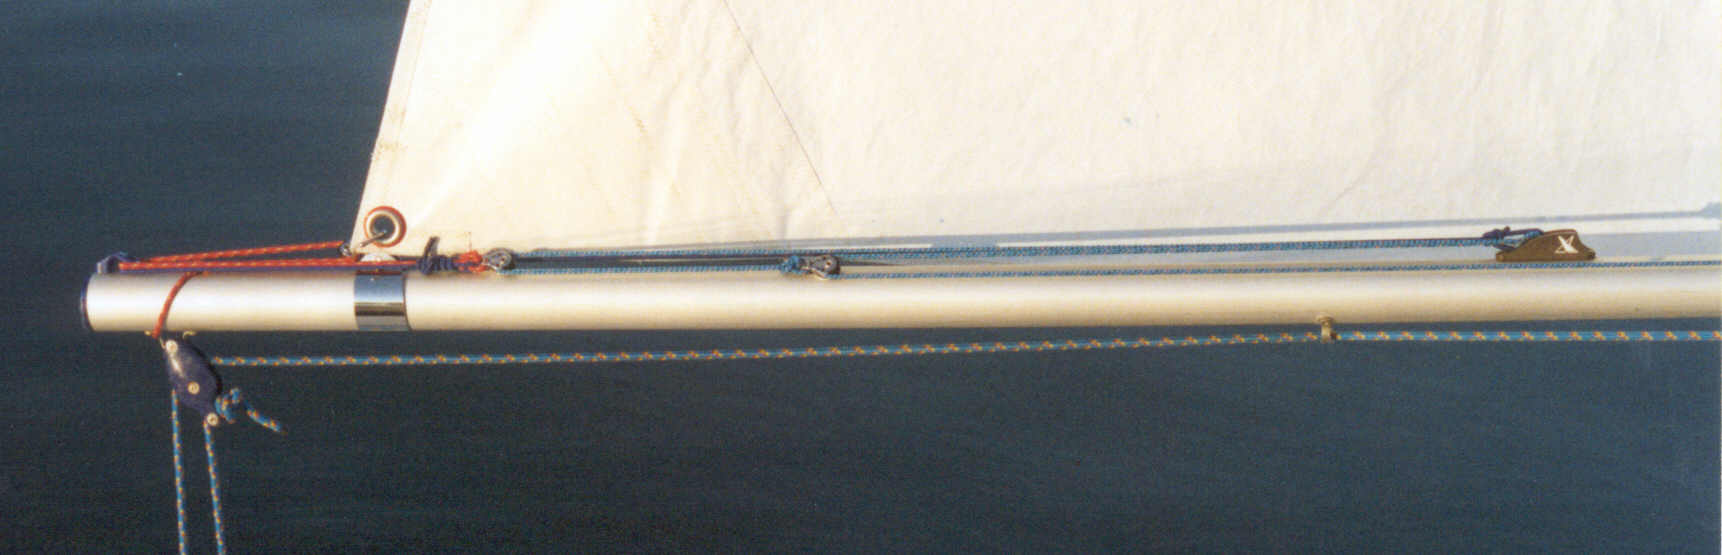
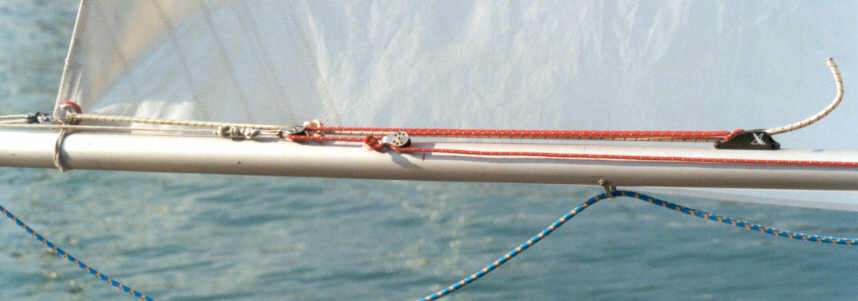
In this photo the shock cord and outhaul line are both tied to the old cleat. I think that it is necessary to tie the shock cord around the boom in front of the cleat to make this system comply with the rules as written. (see 3.(f)vii) The outhaul line is tied as I usually fasten jibsheets to the grommet at the clew of a jib. The short tail leads back to the aft most pulley and dead ends at the 2nd pulley. The long tail feeds through the 2nd pulley and leads foreword to the gooseneck pulley>>>>deck pulley >>> cleat>>>your hand
After sailing a bit with this rig I have adjusted the line at the old Clam cleat to make a better range of sail draft at the foot available. At Mids East I found that I could not get the outhaul quite tight enough in the big breeze. I also understand that I should never strap my outhaul too tight because it makes the boat sail more slowly. So I left the outhaul a little loose and whined to myself about how hard it was to hike that much.
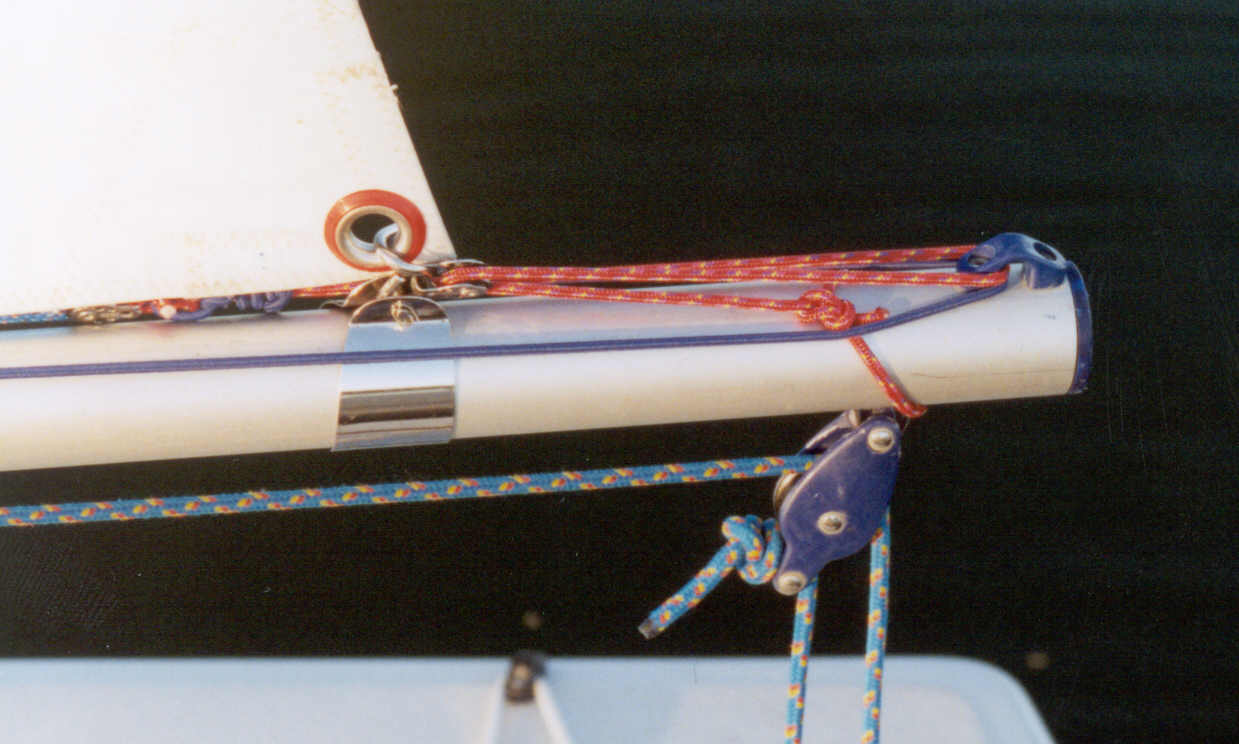
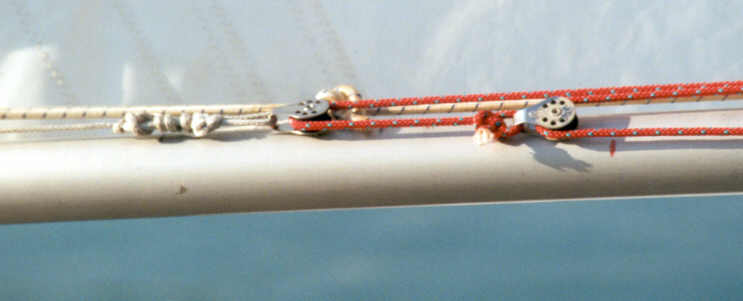
Some of these are not showing very well. I increased the resolution on the rest. In the shot directly above I have pulled the bowline and shock cord to the near side so you can see them better. The rig includes two pieces of line, pulleys, and shock cord. . The aft section as shown was about nine inches too short. I now use a longer line. The pulley and shock cord knots as shown have to pass the clew of the sail, to fully ease the sail A longer aft line solves that problem and lets the system work much more smoothly. With the longer line the knots and pulley always remain in front of the clew.
Notice the the tail of the short line is tied around the boom. This allows the line that passes through the fitting on the end of the boom to run more freely.
The shock cord is tied around the boom in front of the old outhaul cleat, passed through the outhaul fitting and then tied around the line in the loop of the knot that holds the aft most pulley. This arrangement keeps the line close to the boom. It keeps tension of the outhaul line so that the line does not catch on the centerboard or your head. Notice how I have tied a large number of half hitches with the shock cord that go around the line. "Around" is a key word in the rule about the use of shock cord for the purpose of keeping the line close to the boom.
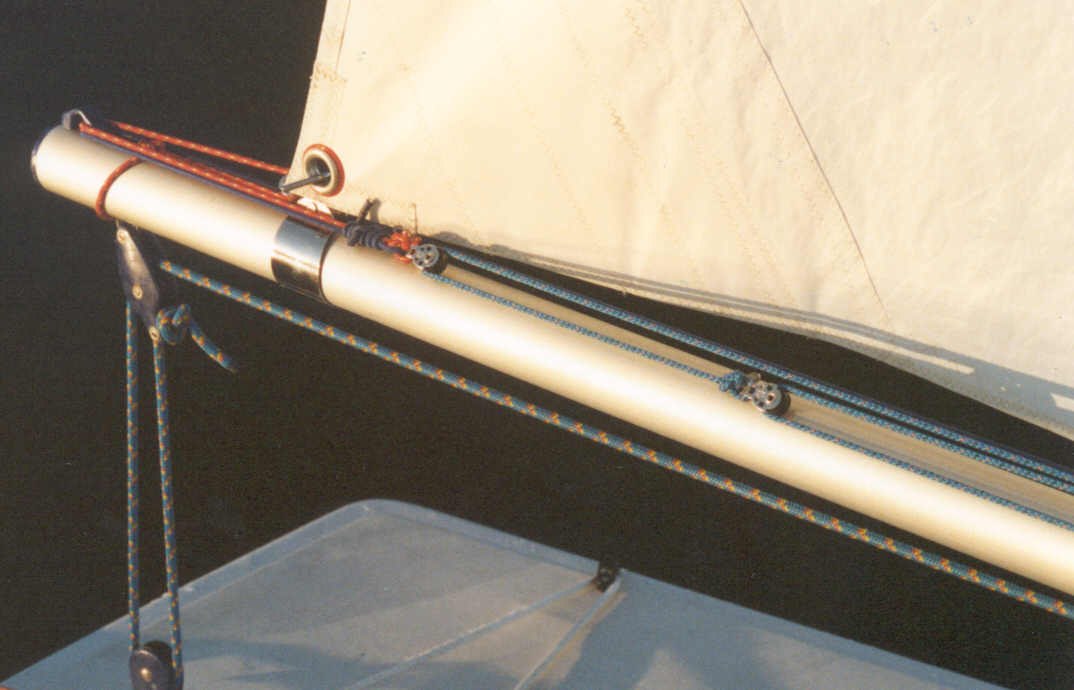
The stainless strap in combination with the clew hook allows for easy adjustment, easy rigging and de rigging and best of all the strap keeps the line from becoming hopelessly tangled when you release the clew from the boom.
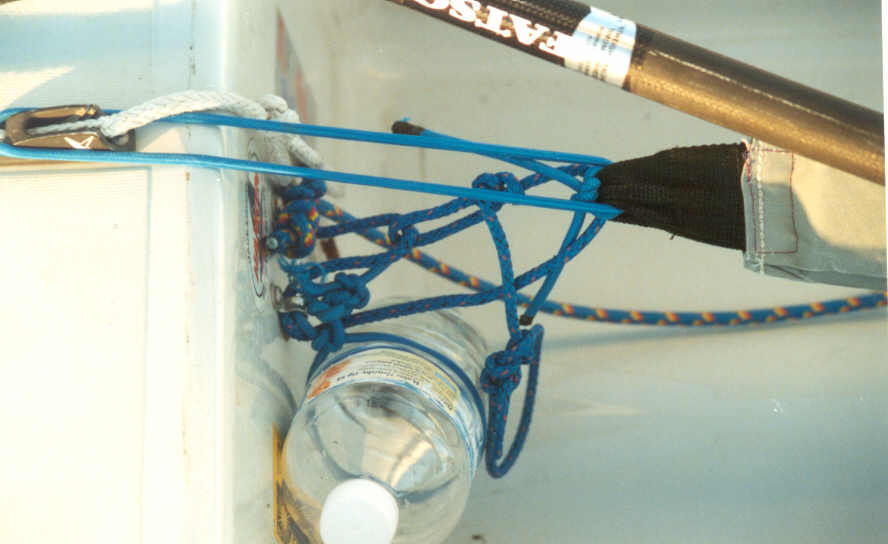
This adjustable hiking strap system really does not work well. Don't copy it. There is too much friction where the line passes through the back of the strap and it takes two hands to move anything. (Visit the hotshot's boats. They usually have it figured out. My old system sucks!) Note the water bottle held in place by a simple lop of shock cord. There are many ways to accomplish the water bottle attachment but I find this one to be very workable. I can rip the bottle out of the shock cord to get a drink and I can re-secure the bottle with one hand by pulling the cap end through the loop. I have never been able to properly install a system that allows me to consistently stretch the attached bottle and cord without having the bottle yank loose. I find that it is easier to always have the bottle come loose and have a simple system where I can re-secure it with one hand.
Note: I also dead end my mainsheet at the back of the cockpit. Some sailors hate to rig this way. Others swear by it. It works for me as shown.
This is where I put my telltales. Not real critical
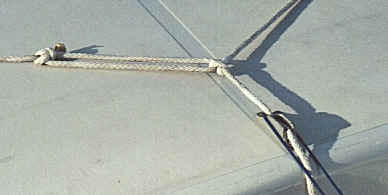
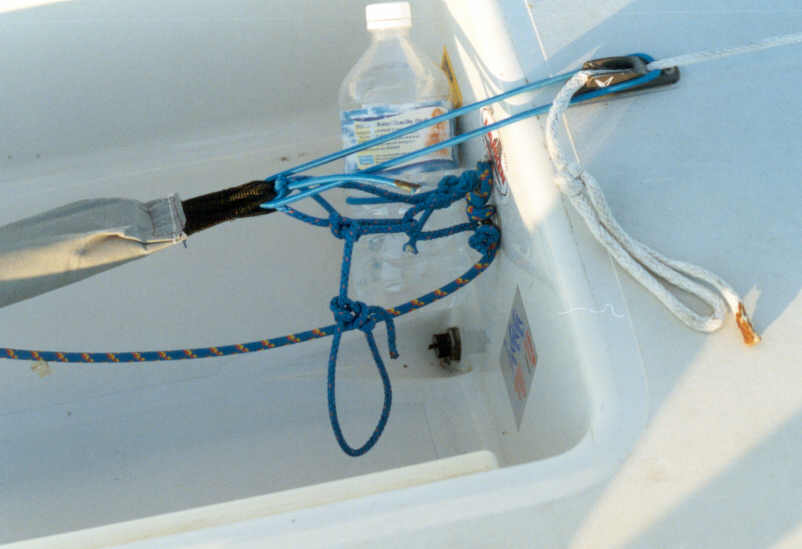
This is a "Traveler Knot" It is one knot that has as components a bowline and an extra loop made fast to the bowline loop. The design of this ONE KNOT allows a big loop to be made that is strong but does not slip. Notice the blue shock cord around the back of the cleat. It is holding the hiking strap off the cockpit floor. The line is From New England Yacht braid and is their 100% spectra 1/4 inch stuff. This one is just over 11 feet long. I won this line as a door prize at the 1999 North Americans in Santa Cruz. Thank you West Marine and Peter Phelan for sponsoring and arranging the sponsorship. The shock cord is 1/8 inch and about 30 inches long.
The traveler knot......on the left you see a simple bowline. Note that the knot part is off to the side so the tiller will not rub on it.
The right hand side of the knot is just a simple loop. (It is the kind of knot that you find in a long piece of line when you are trying to untangle that line. You need to pass the entire length of line through the tangle to free the line.) Notice how I have played with the knot so that it lies close to the deck. Even the tail on the bowline is arranged so that the tail does not stick up and catch the mainsheet while gybing.
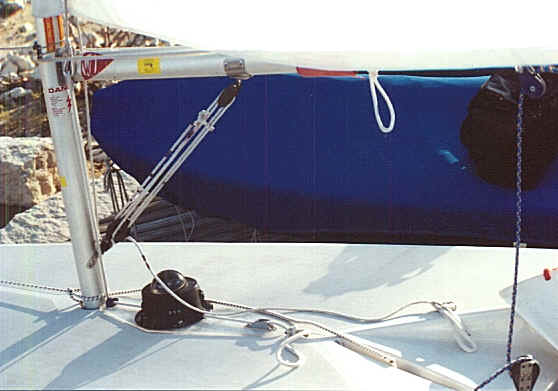
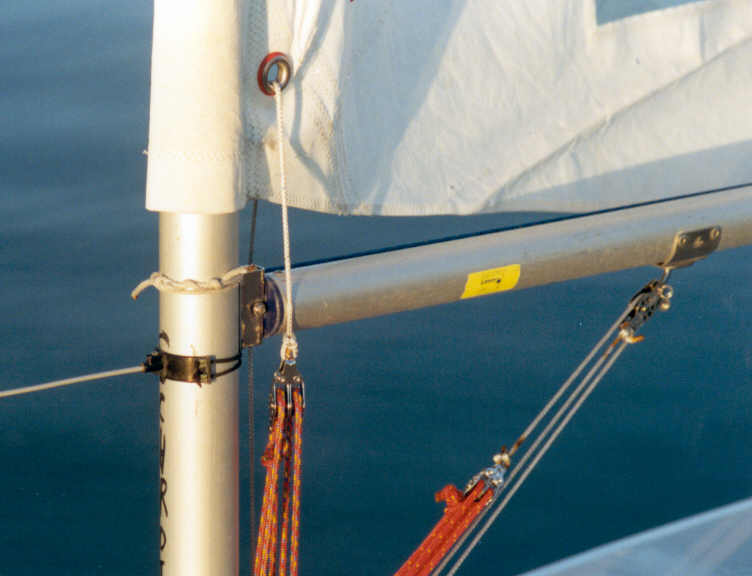
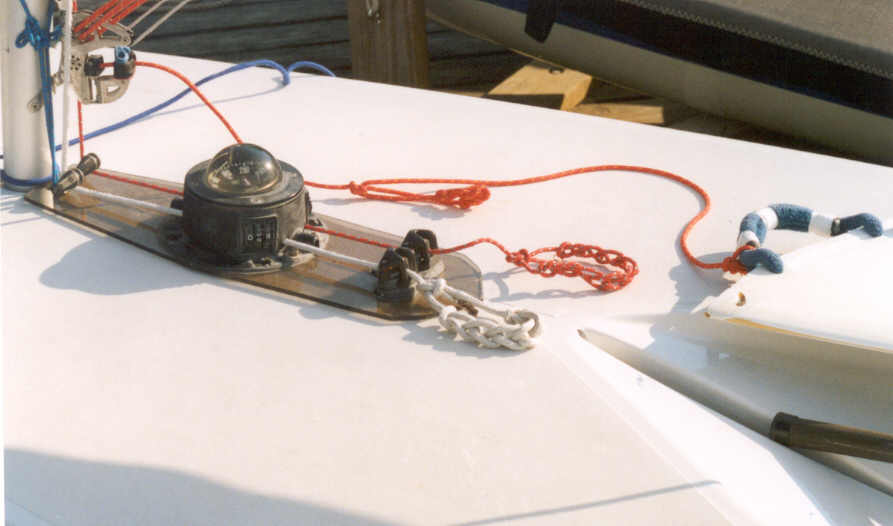
This is the main deck workstation on my boat. Notice the shock cord. It is tied with a loop to the mast and then to the bow fitting. The centerboard is not currently in the slot, but when the line is pulled through the board there will be a stopper knot tied on this side of the board. Because the loop is tied around the mast and off to one side of the board it will not let the shock cord get in the way of the Cunningham cleat. The compass is a twenty year old French device that has a Laser logo. The three white dots are little tumblers where I can store the windward headings. It is mounted on a clear Lexan plate. The cleat and the cunningham eye fit through the Lexan and hold the compass in place. I built my first plate so I could use this compass in the '83 worlds. Now everybody seems to have a plate.
The cunningham is rigged for a 4:1 advantage. You can probably see the thimble that hangs on the end of the piece that passes through the grommet. The line is tied to the vang fitting with one 41 inch tail and one 85 inch tail. The 41 inch tail has the thimble tied in place. The bowline is sloppy enough so that I can remove the thimble. The knot does not need to be untied to pass it through the cunningham grommet. 13 feet of Samson Spectron 12.
OOPS: Since this photo was taken I have added another two feet of line to my cunningham. (Actually I bought a new hunk of rope.) I am making a handle with all the extra line. The handle is made by braiding the line in the same manner that our local construction workers like to store their extension cords. There is no way I can decently explain the braid without photos.
There are some really pretty pictures after what ought to be the bottom of the page.
Scroll way way down past the puppy.
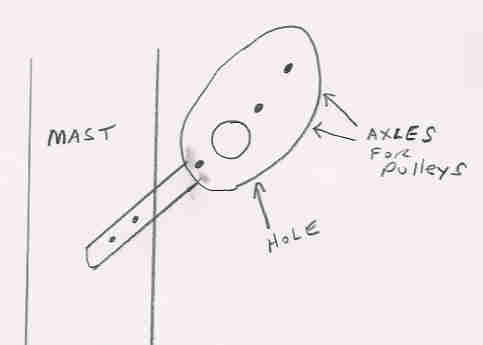
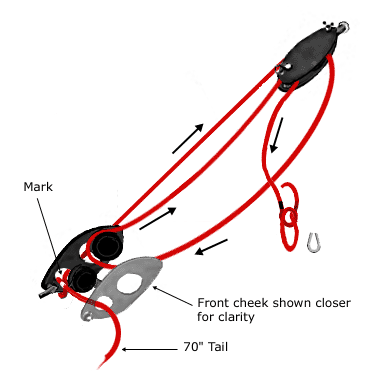
New rules are coming soon but I will describe the vang anyway. The corny drawing above is useful for the second paragraph.
The Boom vang is an 8:1 rig. The line is tied to the lower block with a 70 inch tail and a fourteen foot tail. In the picture the 70 inch tail was led counter clockwise through the blocks. A small bowline was tied in the end. The other end of the line feeds from the base through the bowline and back through the pulley that feeds to the cleat. The dark spots on the line are made with various colored Sharpie markers to indicate settings. I can release to a pre determined setting before the weather mark. The remainder of the line is used for handle and tying the tail to the boat. 20 feet of 3/16th Samson Spectron 12.
The trick to making this vang run smoothly lies in the way you arrange the line in the hole. There is a pulley that encroaches a bit into the hole. You have to arrange the line so that it does not rub on the pulley. Start by marking the line 70" from the end. Pass the short end of the line away from you and through the hole and stop with the mark inside the hole.
Wrap the long end of the line down and around the near cheek of the block. Feed it back up between the two cheeks and bring the line back out toward this side....see crappy drawing>>
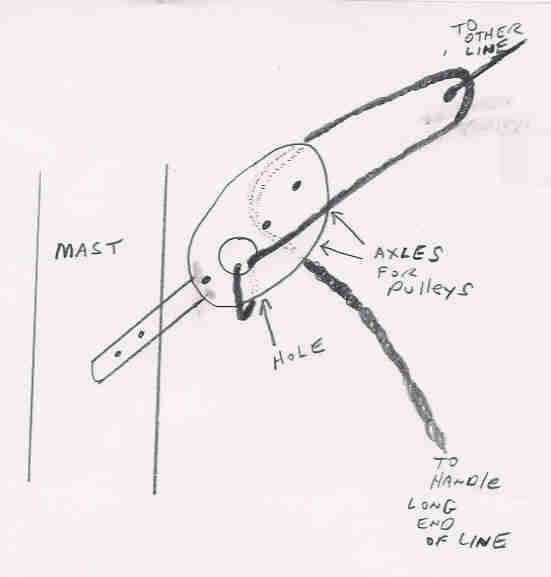
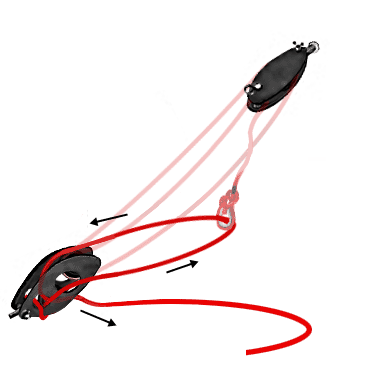
This drawing attempts to show the proper feeding of the long end of the line. The fat black line is the part you would be able to see. The dotted lines represent the part of the line that is inside the fitting and out of sight.
This end of the line will start at the 70" mark inside the hole. It wraps around the block and passes inside between the walls of the block and back out through the hole. (The line will eventually pull on the other end of the line that will be fed according to the diagrams that follow) The line continues up to the purchase loop and back through the lower block and out through the cleat.
Notice that the tail exits "above" the part of the line that was marked and held in its position inside the hole. This will keep the part of the line that passes through from rubbing on the pulley.
The next truly fine drawing is an attempt to show how you should lead the 70" tail. The funky circle on the end of the line is the purchase point where you tie a bowline. That bowline will slide on the line where it says "to other line" in the drawing above.

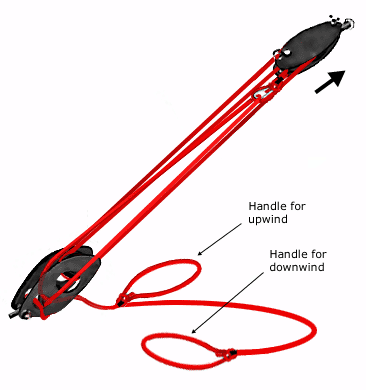
SORRY: I need a new photo of my new vang tail arrangement. I have a better handle and the tail ties to my centerboard handle.
The clew tie down is wrapped around the boom three times. It is easy to tie with all those wraps. 28 Inches of 1/8 inch Samson Spectron 12. I like to squirt the boom in this area with Tri Flow (or Mc Lube when I am feeling rich). Notice how the outhaul is tied with a bowline around and under the boom. This adds security to the eye that holds the mainsheet block. It also takes some of the strain off the plastic outhaul fitting. This system does not replace preventive maintenance but, maybe it won't break as soon and I will cross an extra finish line sometime.
The mainsheet is tied with a figure eight knot. It is one of the Rooster Ropes no tangle mainsheets. Check the Laser Sailor for dealers in your area. I love the thing so far. I used to use 46 feet of 1/4 inch Samson Lite. The Samson has a polypropylene cover and a Spectra core.
This is the location of my loops on the outhaul. It is shown in the photo as tied for medium air. If the wind is very light, I have to make the handle smaller so I can ease the sail far enough. When the wind is strong, I have to wrap the tail around the boom or tie a bigger bowline because it hangs down and annoys me. The line is 3/16 Samson Spectron 12 and it is 242 inches long. Measuring from the clew end of the line I marked 81 inches and 175 inches. I then tied the purchase knots such that the marks were at the centers of the loops. Notice that my loops are small and have no thimbles. The Spectra is slippery enough and durable enough to adjust easily. the knots are just tight enough to keep the entire mess from hanging down and catching on my centerboard or neck. I have been sailing with the pictured line since 1996 West Coast Midwinters. The same is true of my Boom vang , cunningham, and clew tie down. This line has outlasted ten sails and three hulls. The high investment price of Spectra is good for a dollar return within the first year and it works better too.
The red band is a protest flag. There is a 8.5 inch circumference loop and a tail of equal length. There are two strips of Velcro sewn on the cloth. To deploy the flag you simply grab the tail and pull. To store it you just grab the boom and flag in your hand and squeeze the Velcro with your thumb or fingers. The black line under the boom is the Velcro showing. The lower part below that Velcro is the tab you grab to deploy the flag. This flag was one of 84 given out at the 1993 Easter Laser Regatta. If you missed the regatta or have lost your flag, you can order new ones from the North American office. The flags are $10 ($15 Cdn) or Three flags for $20 ($30 Cdn) postage is included in the price. Just mail a check to: Laser Class, 5205 Beacon Drive, Austin, Texas, 78734-1418. Please print your name and address legibly enough so I can actually send you the product.
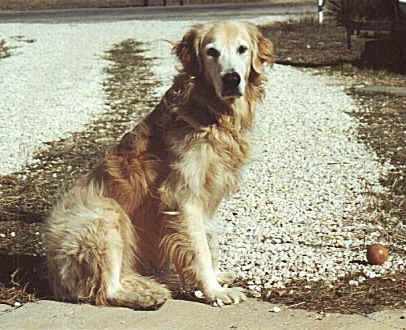
This is Skipper. Feb 9, 1991 to Summer 2006. He died on his 101st birthday. He sorta wore out all at once that day. It was a great 14 years for al of us who knew him.
When I go to regattas and the form has a line that says: "Skipper's name_______" , I always wonder why they ask that stupid question.
While I was taking all the rigging photos, the idiot was rolling around in the dead fish on the shore. This grunge look may have been a record even for him. It took about an hour and two kinds of shampoo to wash out the fish odor. Look closely and you can almost smell him. That is his Lacrosse ball sitting on the ground. They don't float but they are great to throw and lasted forever. We still have a dozen or so. Visit Skipper's page>>> Skipper Photos
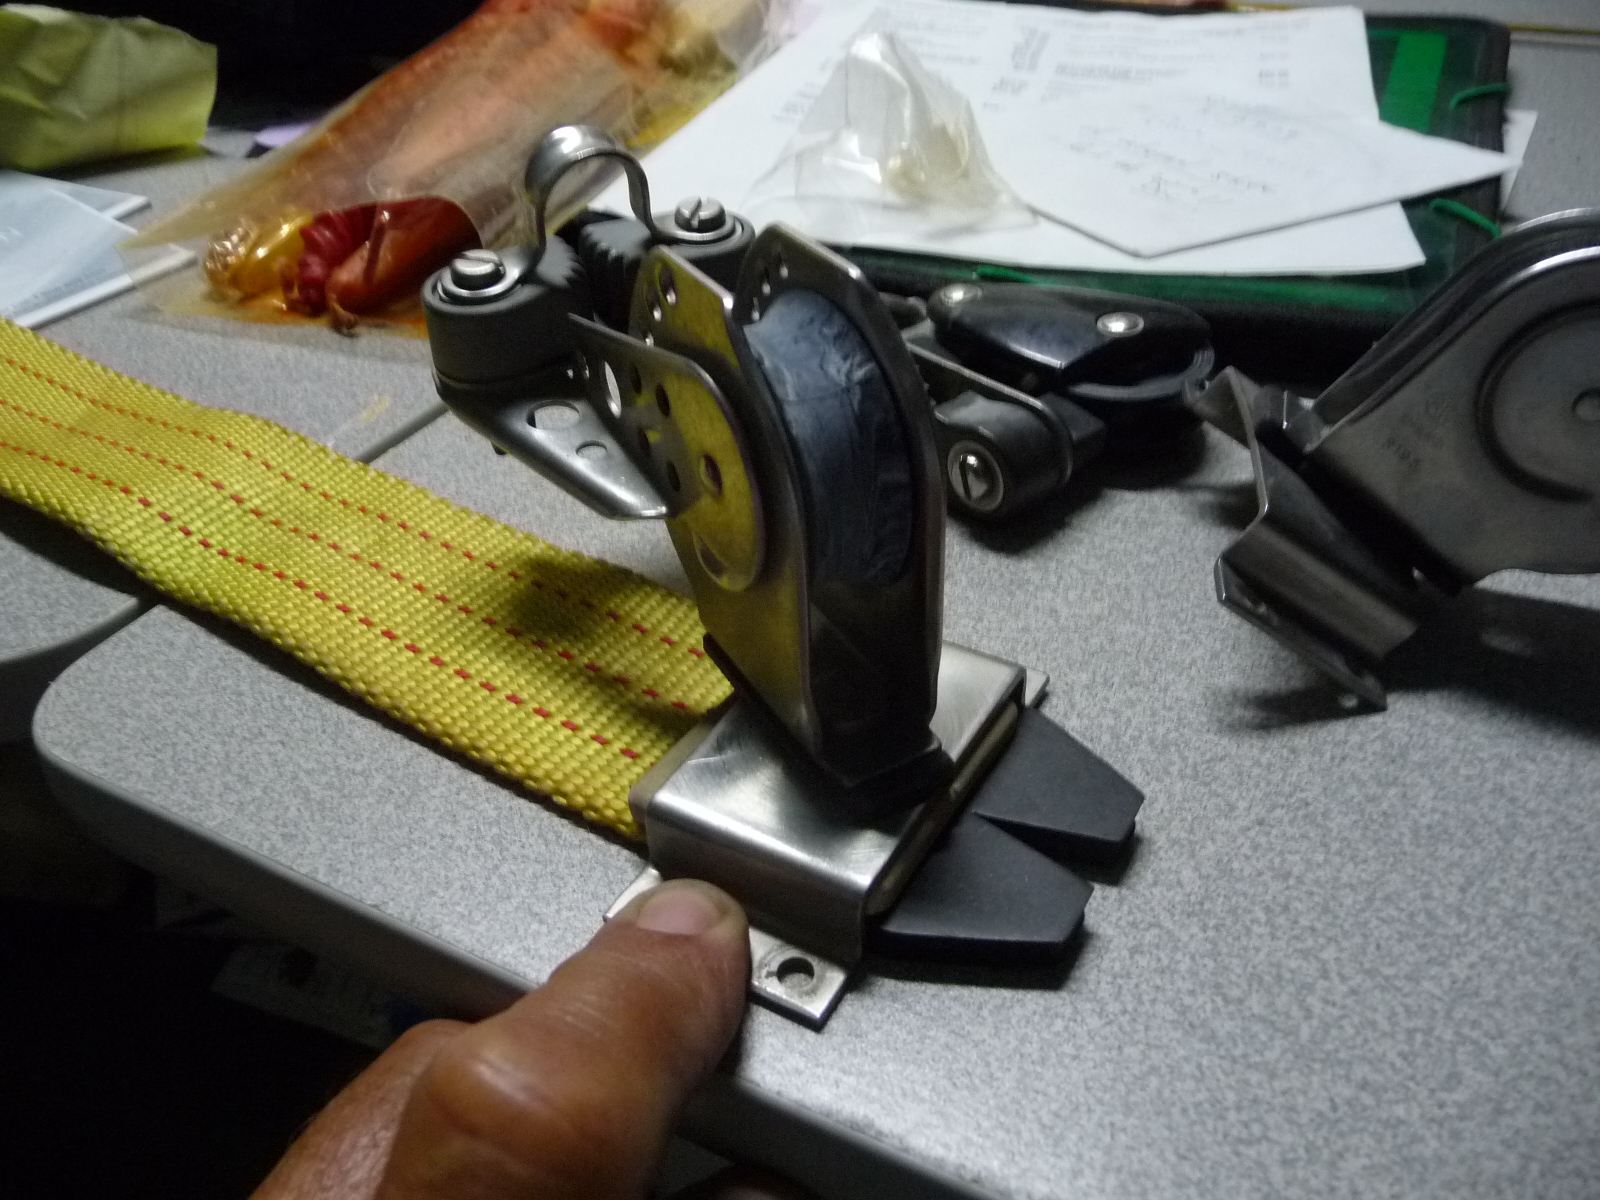
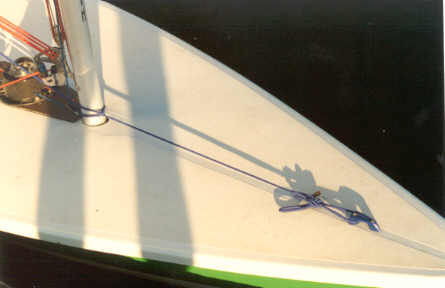
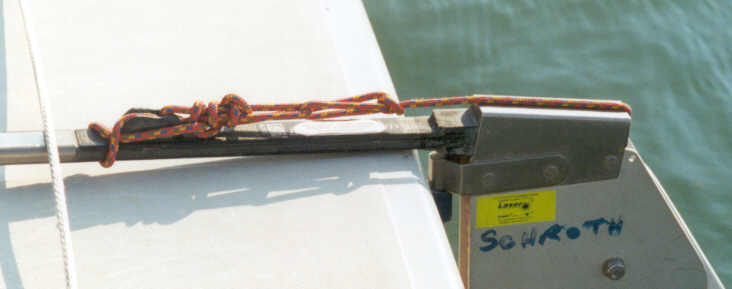
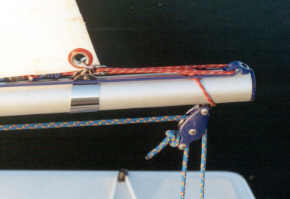
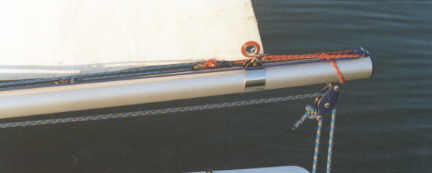
Currently, I using this fitting. The photos below were taken with this fitting in use. This strap is very nice. John Christianson has been developing little goodies like this one for years and he finally can actually use some of his toys. The fitting is now legal.
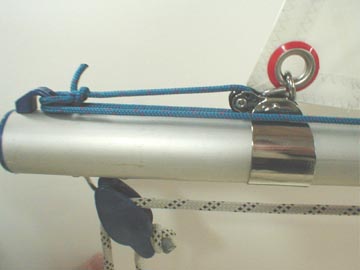
Preliminary thoughts? I think every Laser sailor needs this fitting.
Rigging without this fancy strap: The outhaul hook is very nice for rigging but I cannot tolerate that the clew ends up about an inch off the tube. I have used one piece of 1/8th inch Samson Spectron 12 that is about five feet long as my clew tie down and hook retainer line. I use one end of the long clew tie down to loosely hold the hook as if I were going to use it as a combination downhaul and outhaul. Then after I have hooked the grommet in place with the stainless doohickey, I tie the clew down like I always have. Photo of the clew tie down
The nice thing about this system is that the line and pulley stays in place. I just walk up to the boat and rig...no untangle process for me. I hate having to do that.